For this example, we are using a virtual host against a jungle background. The host was shot against a green screen, and the background keyed out in post production. Because the video contains the alpha channel, the background is transparent, which is the effect we were looking for. In Part 1, we showed how to embed video cue points into the video, now we will create the mechanism to put them to work trigger Flash activity.
If you want to see the videos in action now, go directly to the new Compass Communication's website.
THE MAIN PROJECT:
1. In Flash, create a new project
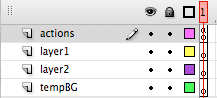
2. Create new layers in this order (from top to bottom) actions, video, animation, background.

3. In the actions layer, on keyframe one, insert a STOP action command
4. Upload the background and place it on the stage the background layer

5. Select the video layer keyframe, and import the video (File→Import→Import Video)
a. Locate your flv file that contains the video cue points
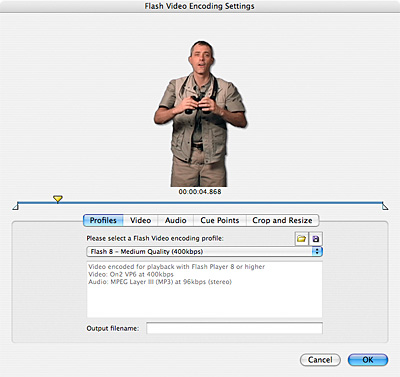
b. Select deployment preferences (Progressive Download or Streaming are the most common).
c. Select your video skin. (In this case, we did not select player controls, as the video was frameless.)
d. Finish your import.
6. Place your movie where you want it, and give it an instance name of "vid". Test your movie to make sure the placement of the video is where you want it.
7. While the movie is playing, take a screenshot of the movie. This still picture will be needed as a reference when you create your animation, which is the next step.

CREATING THE ANIMATION:
8. Create a new movie clip symbol, and name it “animation”.
9. Add new layers in the clip in this order from the top down, actions, tempBg. (All your animation layers will be between actions and tempBg)
10. In the actions layer in frame 1, place a stop command
11. In the tempBg layer, import the background screenshot you captured of the main piece. Make sure to center the background (using align controls)
12. Lock the tempBg track. You now have a canvas on which to “paint” your animation.
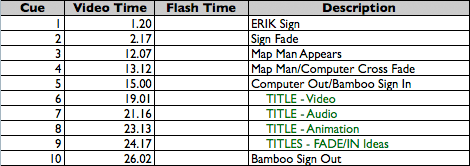
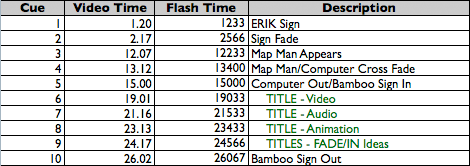
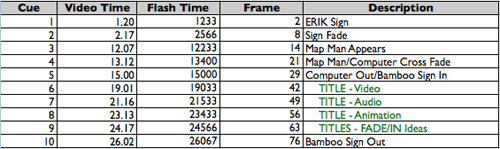
13. Using your cue point spreadsheet as a guide, create animations in the timeline that correspond with each cue point. In the timeline, at the end of each animation, insert a stop command on the actions layer to prevent the animation from playing until the end. The animations will then be “on call” waiting for a cue point to trigger them. Fade in text, graphics, even video to emphasize points, have some fun with it!

LOGGING FRAME NUMBERS:
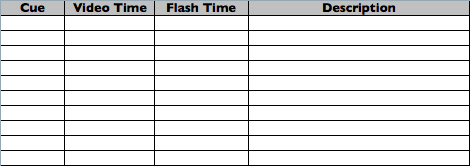
14. On your cue spreadsheet, insert a new column, and label it “frame”.
15. In Flash, log each frame number that corresponds to the start of each animation. For example, if the previous animation ended (with a stop command) at frame 20, the next animation would start on frame 21.
TYING IT ALL TOGETHER WITH A LISTENER (AS2)
Meanwhile, back in the main timeline…
16. On the main timeline, select the keyframe in the “animation” layer, and drag the new animation movie clip onto the stage.
17. Give the animation an instance name of “anim”
18. Align the movie clip to the center of the stage using the align controls. They should line up perfectly.
19. Select the first keyframe in the actions layer, and open the actions panel
20. Insert the following listener code below the stop command:
var vidList:Object = new Object(); //CREATE A LISTENER OBJECT
vidList.cuePoint = function(cues) {
if (cues.info.name == "1") { //CUE NUMBER
anim.gotoAndPlay(2); //FRAME NUMBER
}
};
vid.addEventListener("cuePoint",vidList); //ADD THE EVENT LISTENER
21. For each cue point, copy and paste as many “onCuePoint” events as you have cue points. Using your spreadsheet, you should be building a list that looks like this:
var vidList:Object = new Object();
vidList.cuePoint = function(cues) {
if (cues.info.name == "1") {
anim.gotoAndPlay(2);
}
if (cues.info.name == "2") {
anim.gotoAndPlay(8);
}
if (cues.info.name == "3") {
anim.gotoAndPlay(14);
}
if (cues.info.name == "4") {
anim.gotoAndPlay(21);
}
};
vid.addEventListener("cuePoint",vidList);
SUMMARY:
Once you get used to putting in the cue point numbers and the corresponding frame numbers, you will be off and running! Test your movie, and make adjustments where you need to.
The animation is now synched to the movie. The possibilities are now endless…go and create!
Got any examples of your own using keyframes? Shoot me a link, I would love to see them.
;)